# 7 VS Code Extensions Every MERN Developer Should Install
- Author: Chakkara (https://wurk.fun/user/Chakkara)
- Published: 2026-08-12
- Updated: 2026-08-29
- Canonical (HTML): https://wurk.fun/blog/7-vs-code-extensions-every-mern-developer-should-install
- Cover image: https://ik.imagekit.io/wurk/c7fc2047-9fba-4dee-a479-e52c8e581353_OGGOIeeZV7.png
---
## Introduction
After trying different extensions while building MERN projects, I found a few that genuinely made coding faster, cleaner, and a lot more enjoyable. In this blog, I'm sharing the **7 VS Code extensions** that I think every MERN developer should have, especially if you're just getting started.
I've tried to keep this guide as beginner-friendly as possible. For each extension, I'll explain what it does, how to install it, and show a simple example of how to use it.
## What We'll Cover
1. **Prettier** : Automatically formats your code to keep it clean and consistent.
2. **ES7+ React/Redux/React-Native Snippets** : Instantly generates React components and common snippets.
3. **Tailwind CSS IntelliSense** : Adds autocomplete, suggestions, and color previews for Tailwind CSS.
4. **GitHub Copilot** : AI-powered coding assistant that helps you write code faster.
5. **Thunder Client** : Test and debug REST APIs directly inside VS Code.
6. **Error Lens** : Displays errors and warnings inline as you type.
7. **Auto Rename Tag** : Automatically renames matching HTML and JSX tags.
## Before We Start
Make sure you have **Visual Studio Code** installed.
>📌 **Note for macOS users:** This guide uses Windows/Linux shortcuts. If you are on macOS, simply replace **Ctrl** with **⌘ (Cmd)** (for example, press **⌘ + Shift + X** to open the Extensions Marketplace).
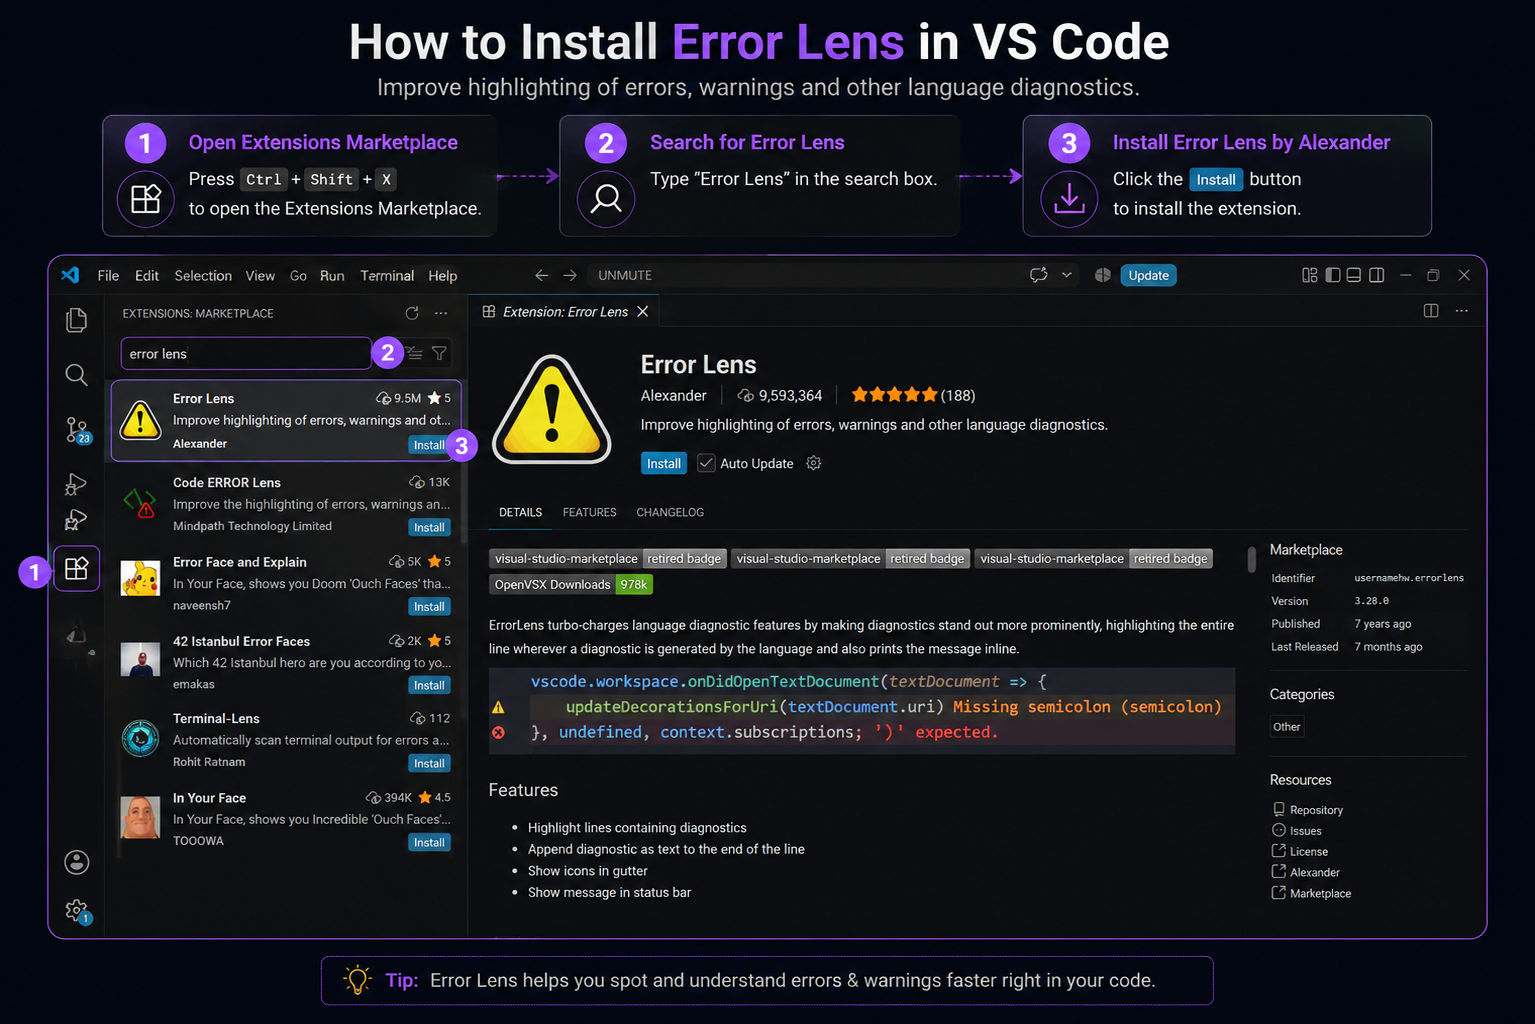
To open the **Extensions Marketplace**, press `Ctrl + Shift + X` (or click the **Extensions** icon in the Activity Bar on the left side of VS Code). From there, search for each extension and click **Install**.
---
## 1. Prettier **⏱ 3–5 mins setup**
Writing code is fun. Stopping every few minutes to fix formatting isn't. Instead of worrying about indentation, spacing, and line breaks, Prettier formats your code automatically whenever you save. It keeps your code clean, consistent, and much easier to read throughout your project.
### Installation
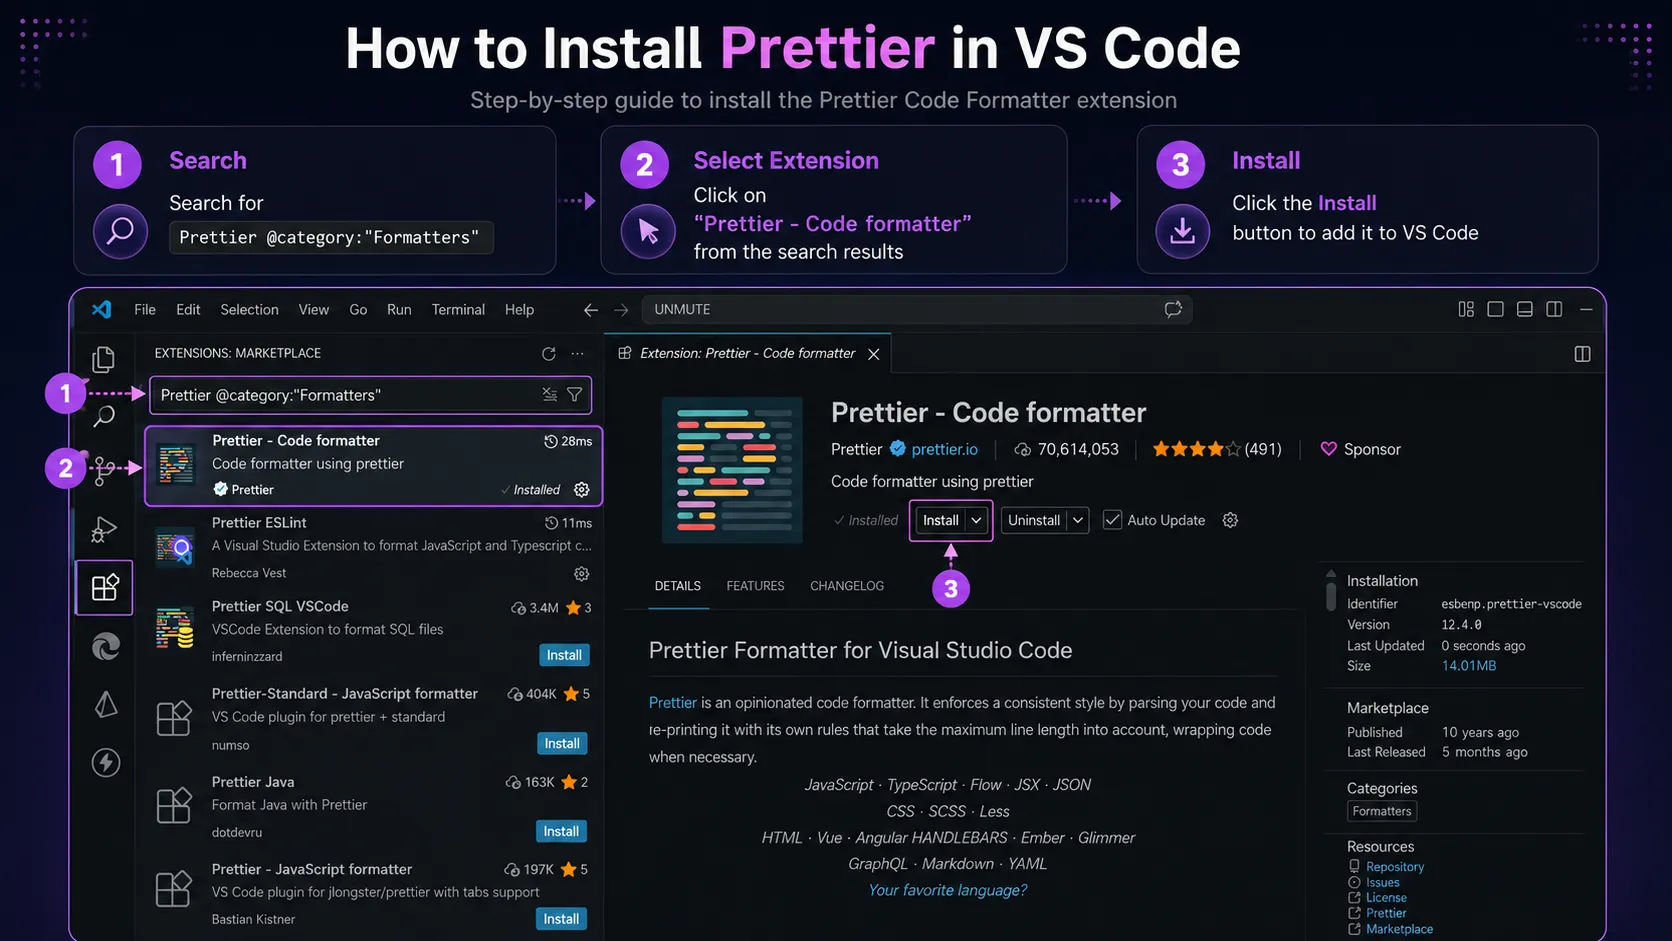
1. Press **Ctrl + Shift + X** to open the **Extensions Marketplace**.
2. Search for `Prettier - Code formatter`
3. Install **Prettier – Code formatter**
### Set Up Prettier
1. Press **Ctrl + Shift + P** to open the **Command Palette**.
2. Type `Preferences: Open Settings (UI)` and press **Enter**.
3. In the Settings search box, type `default formatter`
4. Find **Editor: Default Formatter** and select **Prettier - Code formatter**.
5. Now search for `format on save`
6. Find **Editor: Format On Save** and enable it.
> 💡 **Tip**
> Once **Format On Save** is enabled, Prettier automatically formats your code whenever you save with **Ctrl + S**. You can also trigger it manually at any time by pressing **Shift + Alt + F** (or **Option + Shift + F** on macOS).
### Example
Before formatting:
`function App(){const name="John";return {name}
}`
After pressing **Ctrl + S**:
```jsx
function App() {
const name = "John";
return (
{name}
);
}
```
### Why Use Prettier?
* Automatically formats your code.
* Keeps formatting consistent across your project.
* Makes your code easier to read and maintain.
* Works seamlessly with React, Node.js, Express, and other MERN projects.
---
## 2. ES7+ React/Redux/React-Native Snippets **⏱ 1 min setup**
Writing React components from scratch every time can be repetitive. This extension provides ready-made **snippet shortcuts** that instantly generate common React code, such as functional components, class components, React hooks, and more. Instead of typing the same boilerplate repeatedly, you can generate it with just a few keystrokes.
### Installation
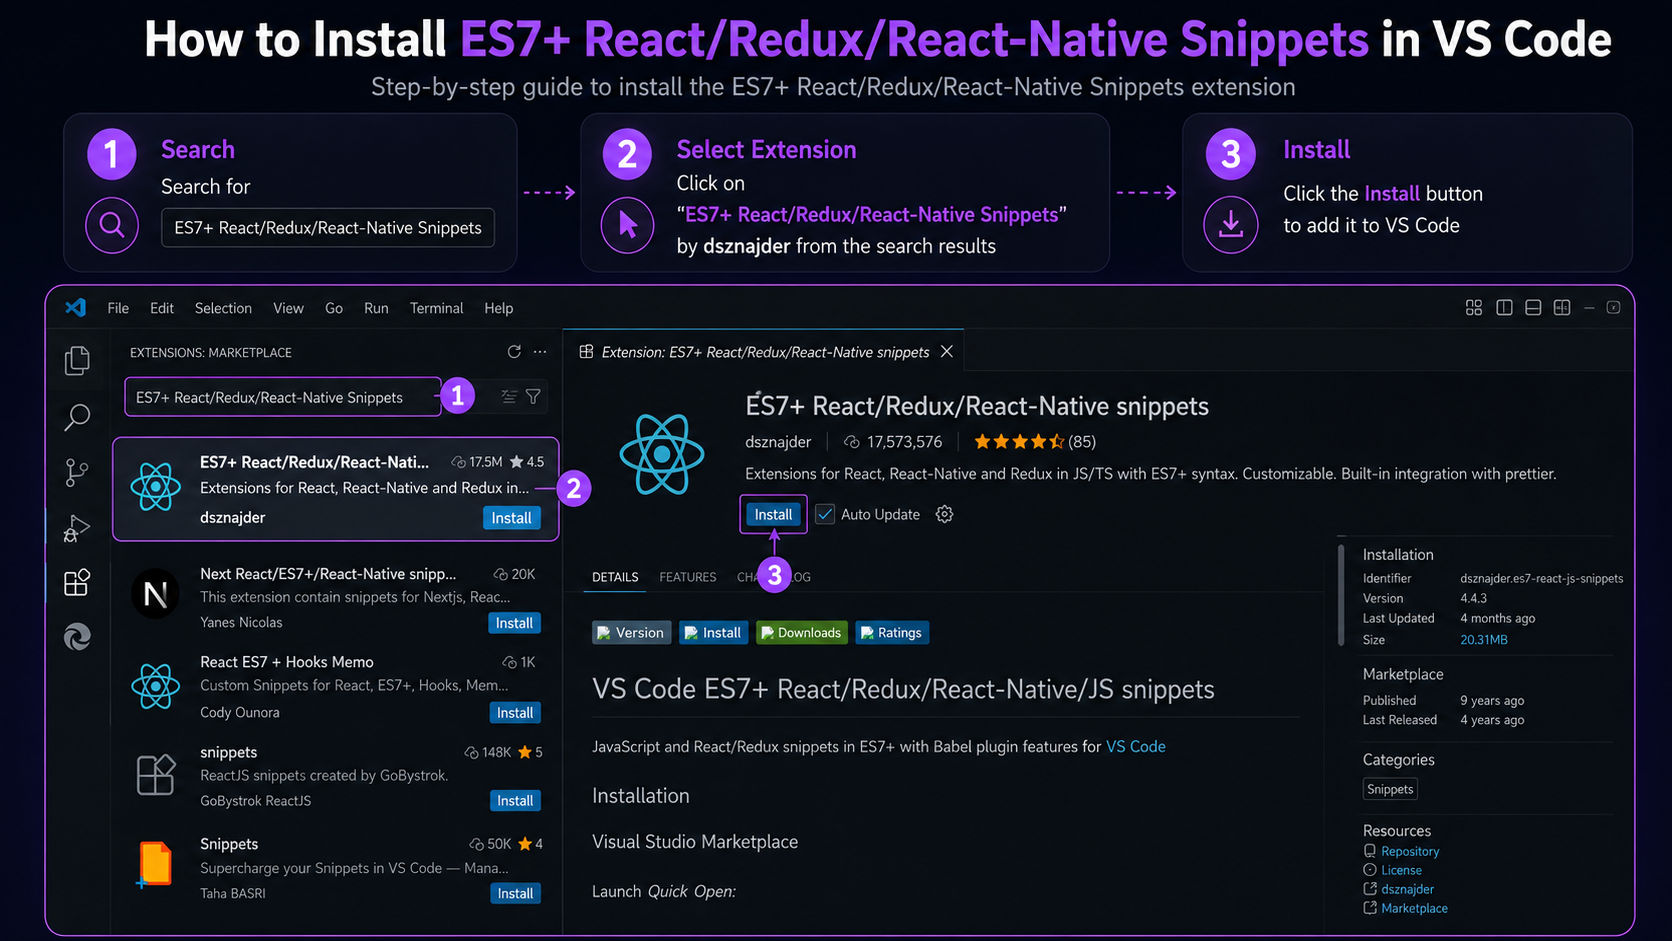
1. Press **Ctrl + Shift + X** to open the **Extensions Marketplace**.
2. Search for `ES7+ React/Redux/React-Native Snippets`
3. Install **ES7+ React/Redux/React-Native Snippets** by **dsznajder**.
### Example
1. Create a new file named **Navbar.jsx**.
2. Type the snippet shortcut:
`rafce`
3. Press **Tab** or **Enter**.
The extension automatically generates this React component:
```jsx
import React from 'react'
const Navbar = () => {
return (
Navbar
)
}
export default Navbar
```
> 📌 **Note**
> `rafce` is one of the many snippet shortcuts included with this extension. You can find the complete list on the extension's **Marketplace** page under **Feature Contributions → Snippets**.
### Why Use ES7+ React/Redux/React-Native Snippets?
* Generates React components in seconds.
* Reduces repetitive typing.
* Automatically uses your file name as the component name.
* Makes React development faster and more efficient.
---
## 3. Tailwind CSS IntelliSense **⏱ 1–2 mins setup**
If you use Tailwind CSS, this extension makes styling much easier. It provides class name suggestions, highlights colors, and even shows a preview of the CSS behind each utility class, so you don't have to memorize every Tailwind class.
### Installation
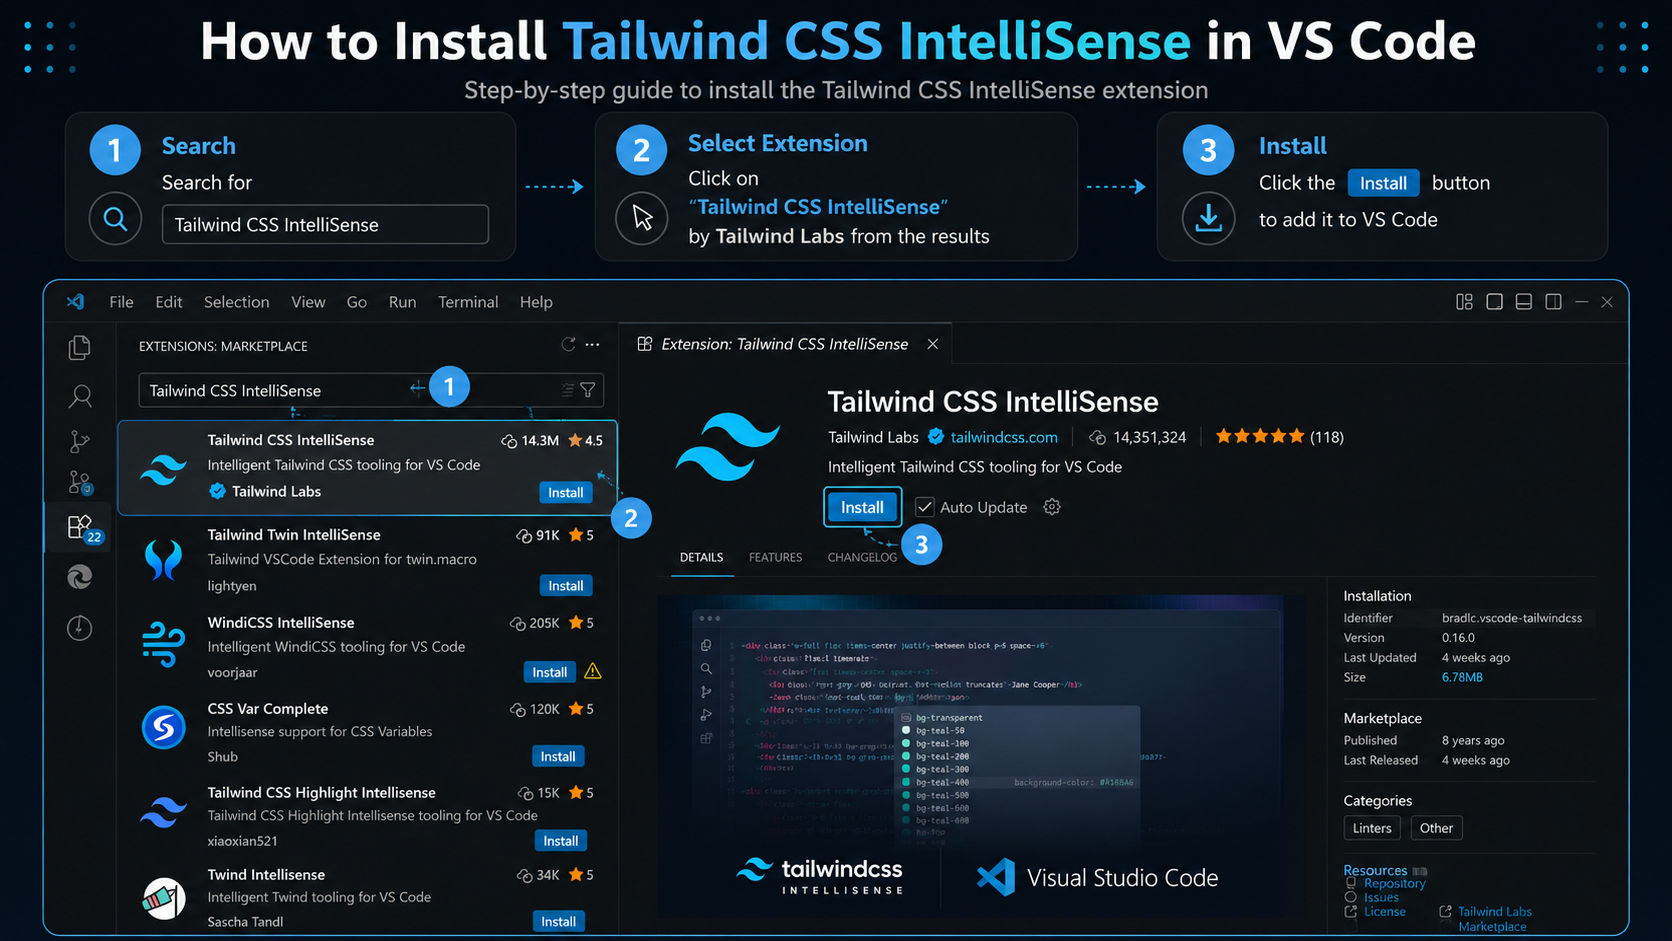
1. Press **Ctrl + Shift + X** to open the **Extensions Marketplace**.
2. Search for `Tailwind CSS IntelliSense`
3. Install **Tailwind CSS IntelliSense** by **Tailwind Labs**.
### Example
Open a React component that already has Tailwind CSS set up.
Inside a `className`, start typing:
`className="bg-"`
A list of matching Tailwind classes will appear automatically.
Select **bg-blue-500** and press **Tab** or **Enter**.
You'll also see a small color preview beside the class name.
> 📌 **Note**
> This extension only works in projects where **Tailwind CSS** is already installed and configured.
### Why Use Tailwind CSS IntelliSense?
* Autocompletes Tailwind CSS classes.
* Reduces typos while writing class names.
* Shows color previews for utility classes.
* Displays the CSS applied by each class when you hover over it.
---
## 4. GitHub Copilot **⏱ 3–5 mins setup**
GitHub Copilot is an AI coding assistant that helps you write code faster by suggesting code as you type. It can generate functions, explain code patterns, and reduce repetitive coding, making it a great companion for MERN development.
### Setup
> 📌 **Note**
> **GitHub Copilot** is built directly into current versions of **VS Code**. If you don't see it, open the **Extensions Marketplace** (**Ctrl + Shift + X**), search for `GitHub Copilot`, and install the official extension by **GitHub**.
>
> * **Free Plan:** GitHub Copilot Free includes up to 2,000 code completions per month.
> * **Copilot Pro:** Copilot Pro costs $10/month with unlimited code completions, while verified students get Copilot Student for free.
> * **Free Access:** Eligible teachers and popular open-source maintainers may also receive Copilot Pro for free.
1. Click the **GitHub Copilot** icon in the **Status Bar** at the bottom-right of VS Code.
2. Select **Sign in to use AI features**.
3. Click **Continue with GitHub**.
4. Your browser will open. Sign in to your **GitHub account** and authorize **Visual Studio Code**.
5. After authorization, return to VS Code. Copilot is now connected to your GitHub account.
### Using Inline Suggestions
1. Open any JavaScript, TypeScript, or React file.
2. Start typing code or write a comment describing what you want to create.
3. Copilot will show its suggestion in **gray text**.
4. Press **Tab** to accept the entire suggestion.
5. Press **Ctrl + Right Arrow** to accept the suggestion one word at a time.
6. If multiple suggestions are available, press **Alt + ]** to switch between them.
Copilot works in the background while you type and may take a moment to generate a suggestion.
### Using Copilot Chat
1. Open **View** from the top menu and select **Chat**.
2. Choose a chat **model** and **mode** from the options at the bottom of the Chat panel.
3. You can choose between modes such as **Agent**, **Ask**, **Edit**, and **Plan**.
4. Ask Copilot a question or tell it what you want it to do, such as asking it to **explain a function**.
### Managing Copilot
You can click the **GitHub Copilot** icon in the Status Bar at any time to manage its suggestions. You can disable Copilot for specific languages or turn its suggestions off completely.
### Example
Write a comment describing what you want to build:
`// Create an Express route to register a new user`
Press **Enter**.
GitHub Copilot will automatically suggest code in grey text.
Press **Tab** to accept the suggestion.
### Why Use GitHub Copilot?
* Suggests code as you type.
* Helps write repetitive code much faster.
* Supports many programming languages, including JavaScript and TypeScript.
* Great for building React, Express, and other MERN applications.
---
## 5. Thunder Client **⏱ 1 min setup**
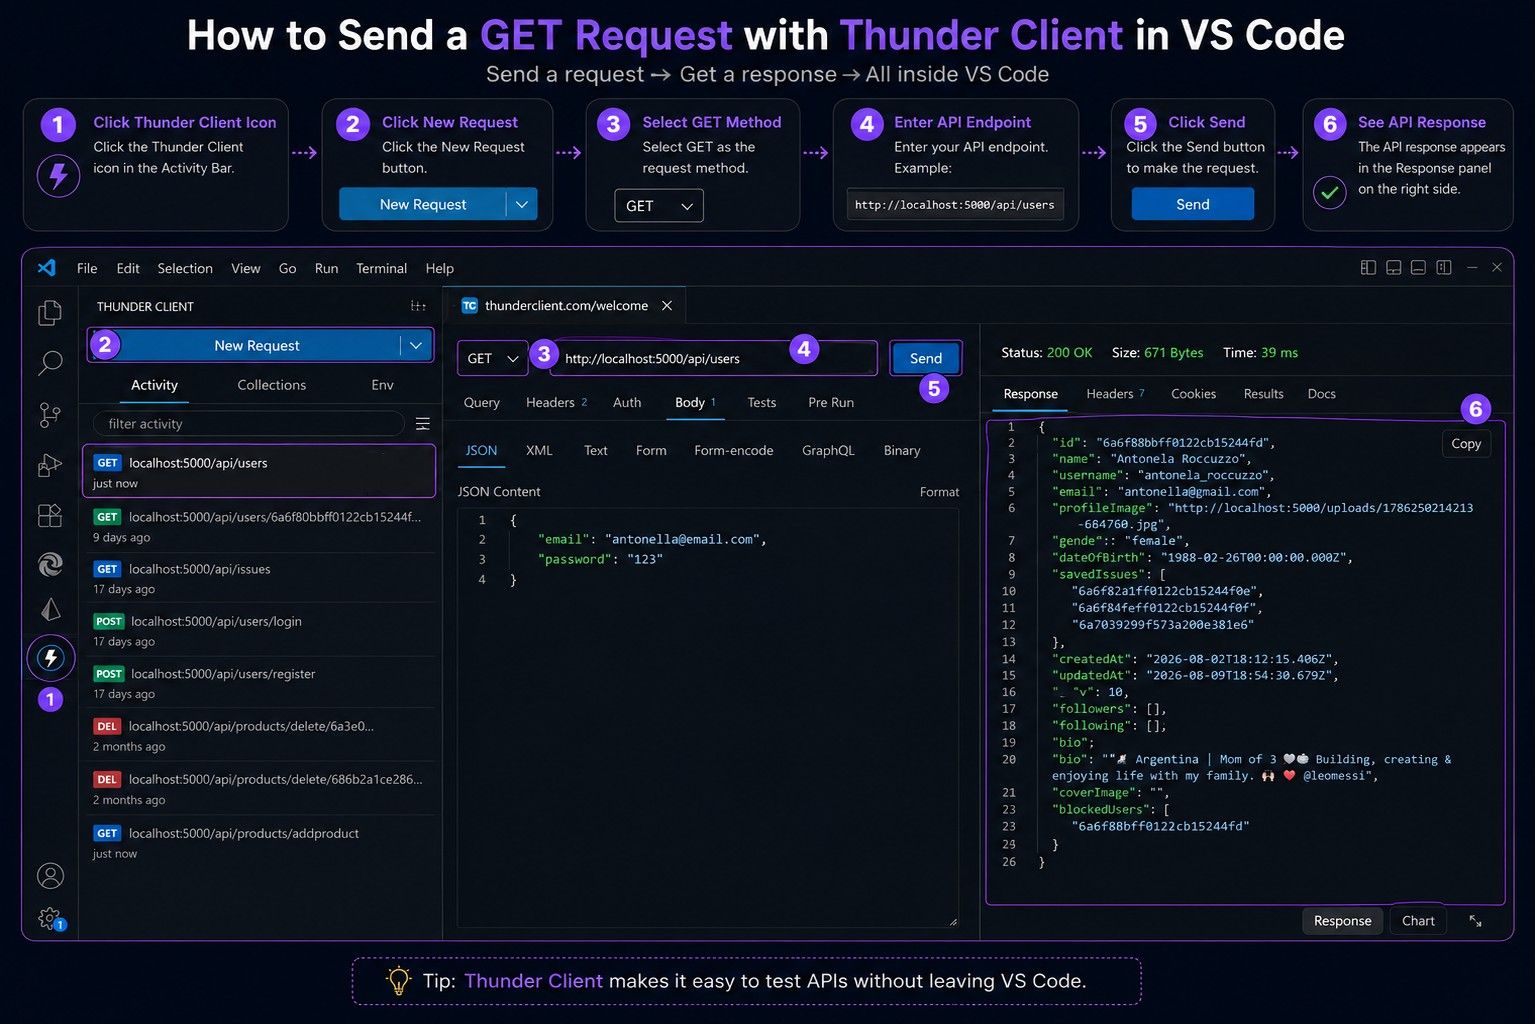
Testing APIs is a normal part of backend development. Thunder Client lets you send requests and inspect responses directly inside VS Code, making API testing quick and convenient.
### Installation
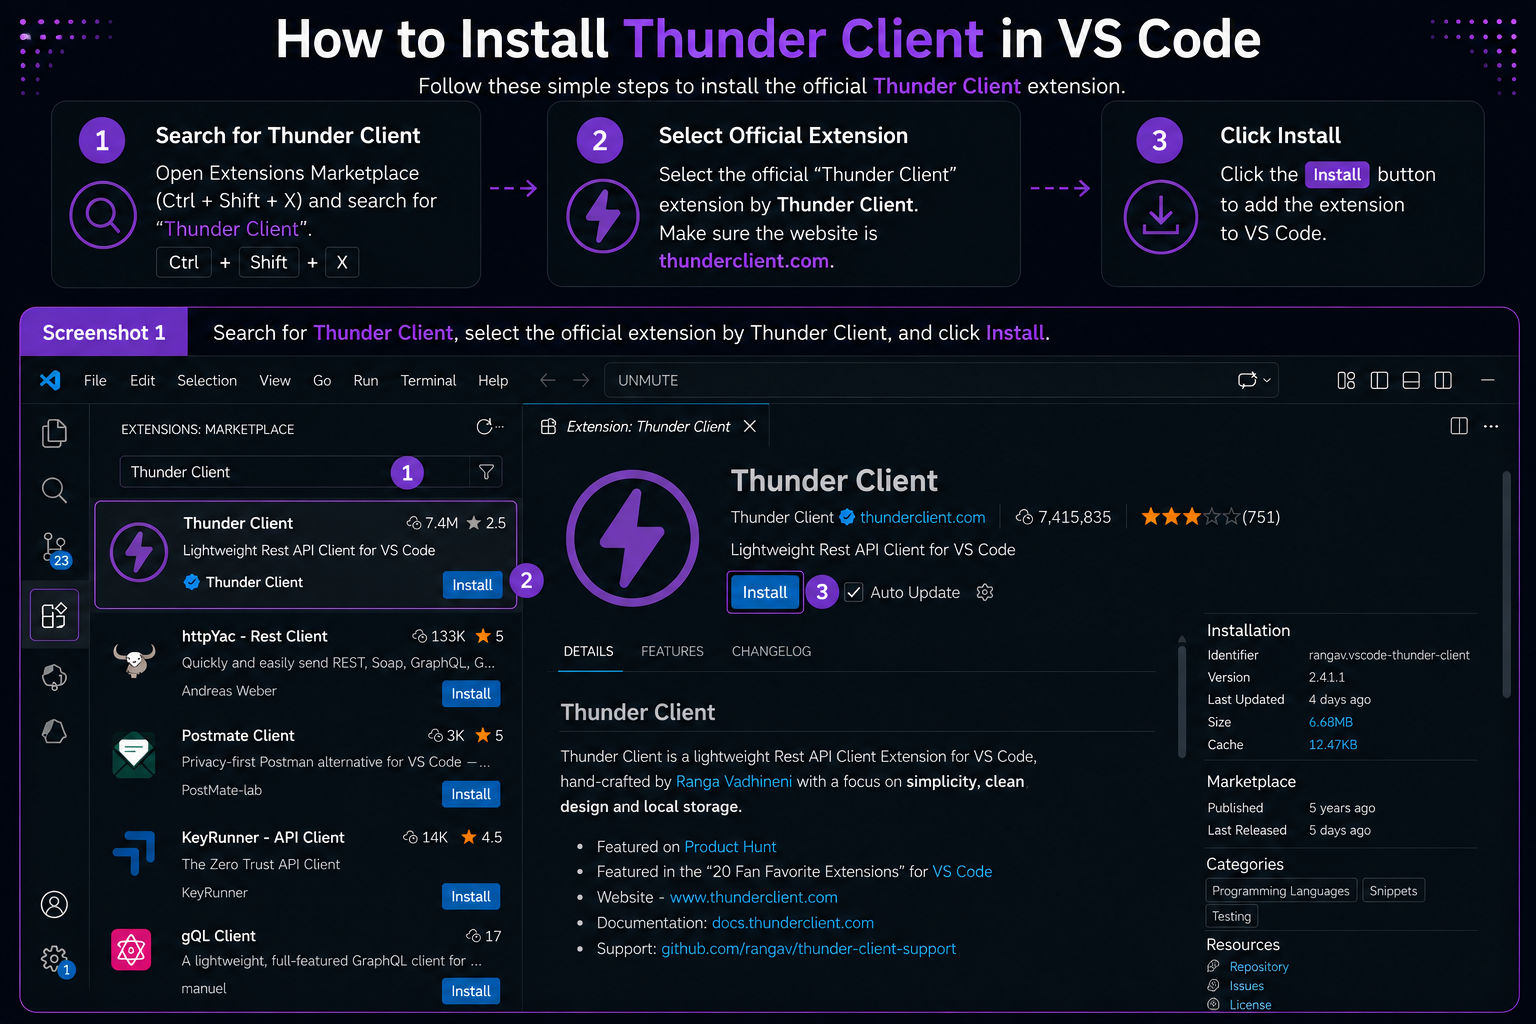
1. Press **Ctrl + Shift + X** to open the **Extensions Marketplace**.
2. Search for `Thunder Client`
3. Select the official **Thunder Client** extension by **Thunder Client**.
4. Make sure the extension shows **thunderclient.com** as its official website, then click **Install**.
### Example
1. Click the **Thunder Client** icon in the Activity Bar.
2. Click **New Request**.
3. Select **GET** as the request method.
4. Enter your API endpoint, for example:
`http://localhost:5000/api/users`
5. Click **Send**.
The API response will appear directly inside VS Code.
### Why Use Thunder Client?
* Test REST APIs without leaving VS Code.
* Supports GET, POST, PUT, PATCH, and DELETE requests.
* Displays formatted API responses.
* Useful for testing Express APIs while building MERN applications.
---
## 6. Error Lens **⏱ 1 min setup**
Finding errors becomes much easier when they're displayed directly in your editor instead of being hidden away in the Problems panel. Error Lens helps you spot and fix issues the moment they appear.
### Installation
1. Press **Ctrl + Shift + X** to open the **Extensions Marketplace**.
2. Search for `Error Lens`
3. Install **Error Lens** by **Alexander**.
### Example
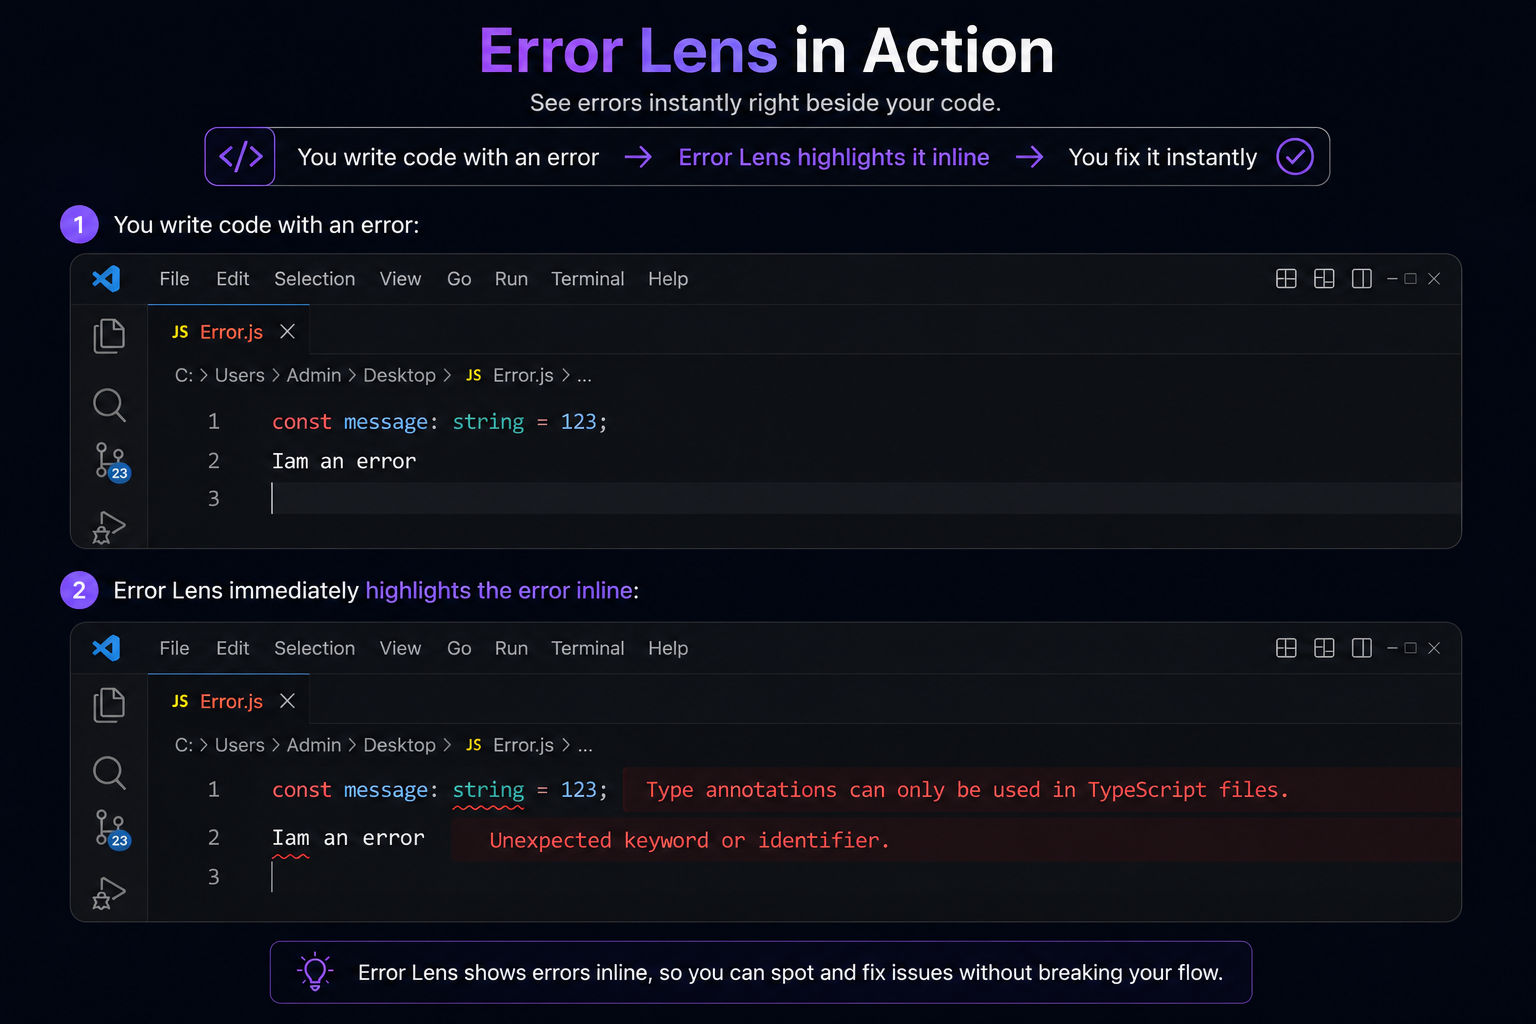
Write code with an error, for example:
`const message: string = 123;`
Error Lens immediately highlights the error inline:
```diff
- Error: Type annotations can only be used in Typescript files.
```
### Why Use Error Lens?
* Displays errors and warnings directly in your editor.
* Helps you spot mistakes instantly.
* Reduces the need to check the **Problems** panel.
* Makes debugging faster while building MERN applications.
---
## 7. Auto Rename Tag **⏱ 1 min setup**
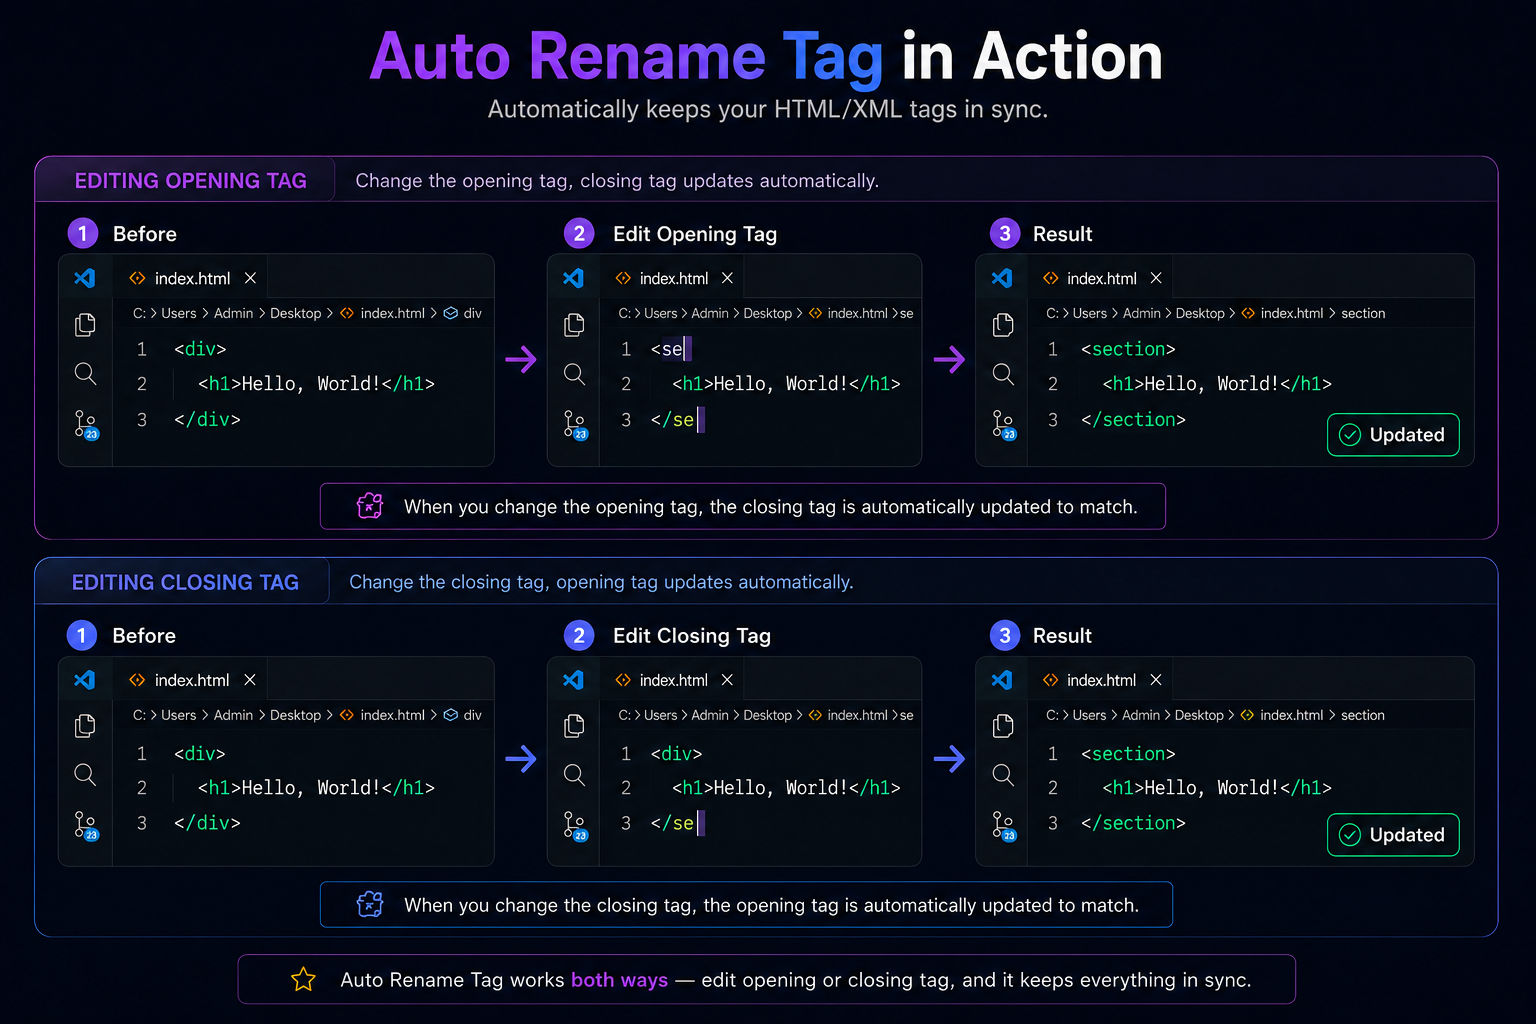
When editing HTML or JSX, you'll often need to rename a tag. Auto Rename Tag automatically updates the matching closing tag, saving time and preventing mistakes.
### Installation
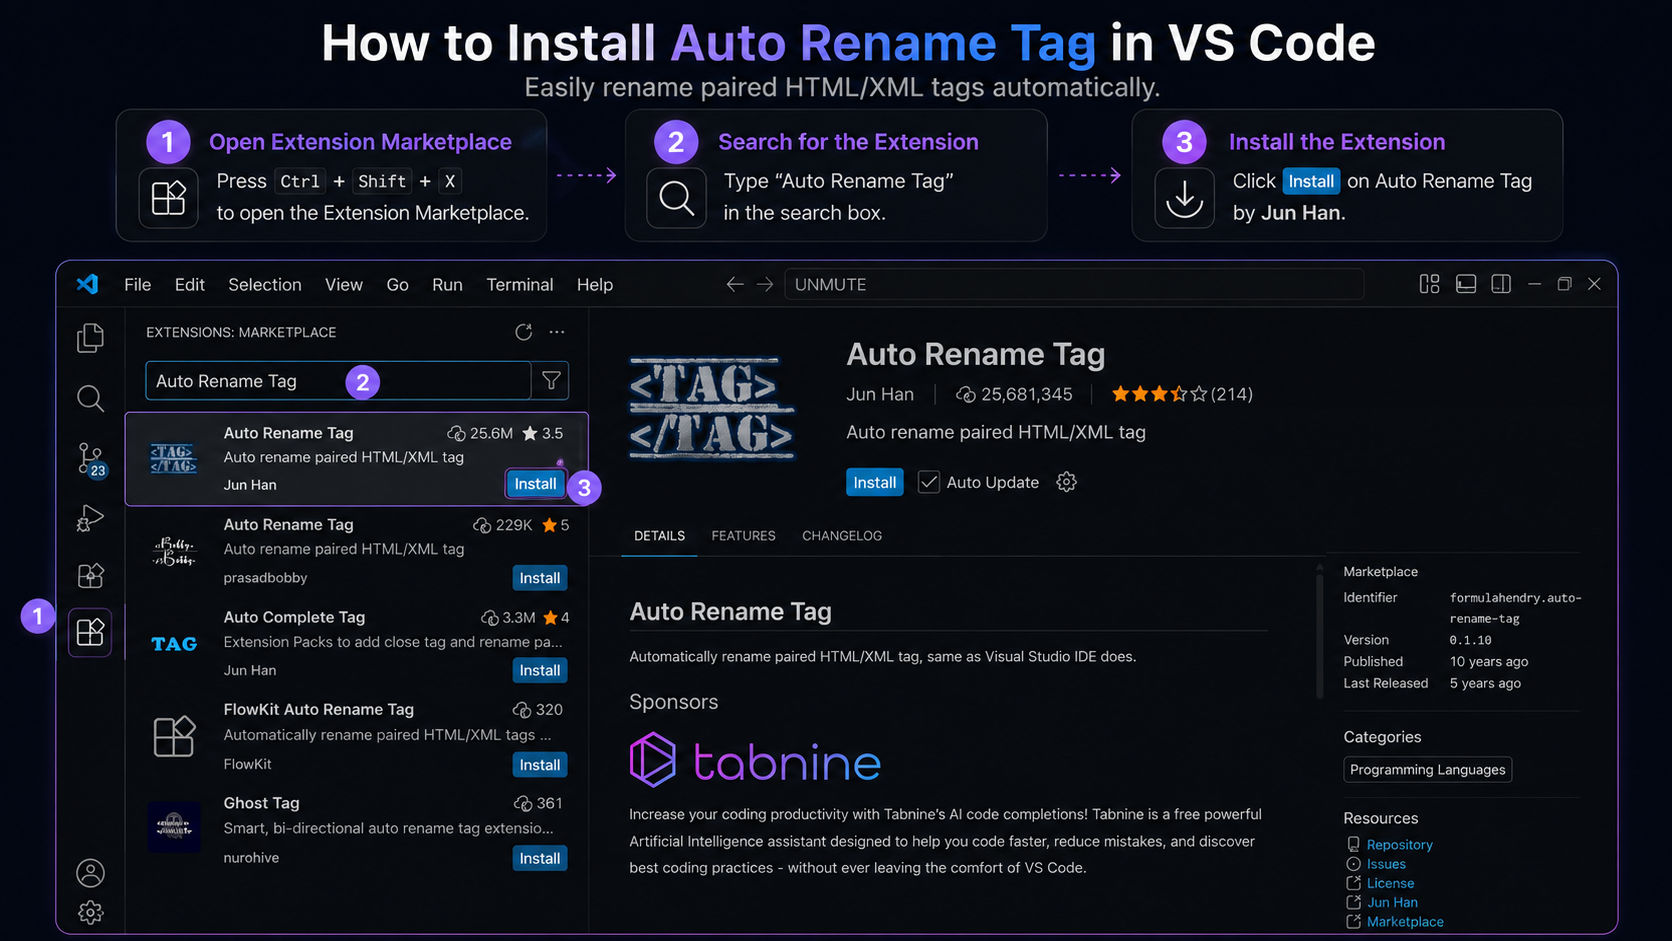
1. Press **Ctrl + Shift + X** to open the **Extensions Marketplace**.
2. Search for `Auto Rename Tag`
3. Install **Auto Rename Tag** by **Jun Han**.
### Example
Before:
```html
Hello, World!
```
Change the opening `` tag to ``
Instead of updating the closing tag manually, the extension automatically changes it to:
```html
```
### Why Use Auto Rename Tag?
* Automatically updates matching HTML and JSX tags.
* Prevents mismatched opening and closing tags.
* Saves time while editing HTML and React components.
* Makes changing JSX tags quicker and easier.
---
### Thanks for Reading❤️
I hope these extensions make your MERN development smoother and more enjoyable. If you use any other extensions you really like, drop them in the comments. I’d love to hear your recommendations too!
Happy Coding 🚀